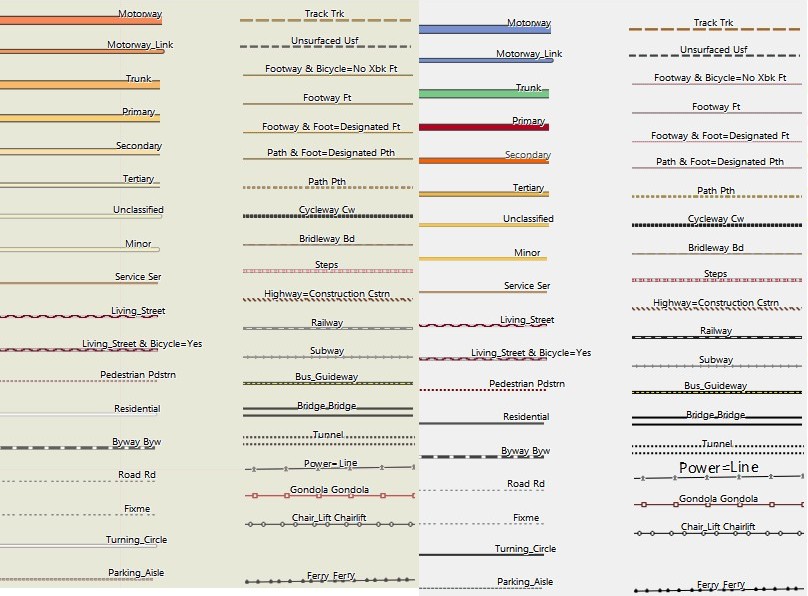
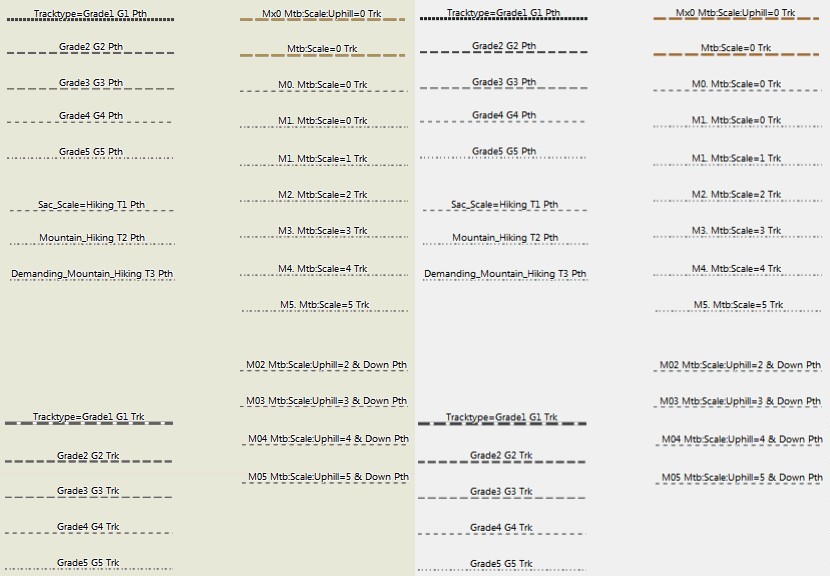
Following is a map Legend so you can see what is what. Basically the layouts differ on use case, line width and colour of roads. "Legacy" typfiles use the higher contrast blue/green/red/yellow street differentiation - while "modern" layouts use a lower contrast red-yellow road differentiation. The philosophy behind this is that on legacy typfiles you know exactly what kind of classification a street has, while the modern layout there is a more fluid approach from motorways to small roads that subconciously tells you the road class. Google maps is a prime example of modern type of layouts - while typical German road maps are the inspiration for the legacy layout. Modern layouts give you a better overview when looking at the map on a big screen/display as it's easier for the brain to class importance in an instant and looks nicer/calmer - while legacy layout gives a more exact classification but needs more time to process the information and looks less nice. The width of the layout should be chosen according to the DPI of your device and preferences. As most currently sold garmin devices (except smartwatches) are optimal in my eyes for the Wide layouts - special layouts like, winter, hiking, easy or topo are only available in wide style. Quick guide to the colors used for ways and tracks: Black: Cycleway or paved track. Grey: usually unpaved way of lesser quality. Brown: Path - or footway - the smaller the dots/segments of the line - the less even the surface. Thin continuous lines are of unknown qualit</surface. In general for brown/red/grey ways: If a way is not rated for difficulty - it will be shown as continous line. for Classification and explications used - scroll down to the end of this page. The main tracks and pathes: Other Important Lines Restaurants and Shopping Sport and Tourism Municipal and other POI Landuses: Sport and Public Places: Natural and Tourism Difficulty and state of way/street. M12 / Mn34 -- the first number is the mtb:scale, the second number the mtb:scale:uphill. "n" stands for the way being part of a mtb route/network. See:http://wiki.openstreetmap.org/wiki/Key:mtb:scale Note however - that I also map the keys smoothness and surface to tracktype G value. So I try to get the best value - also if it may contradict with the actual value for tracktype.
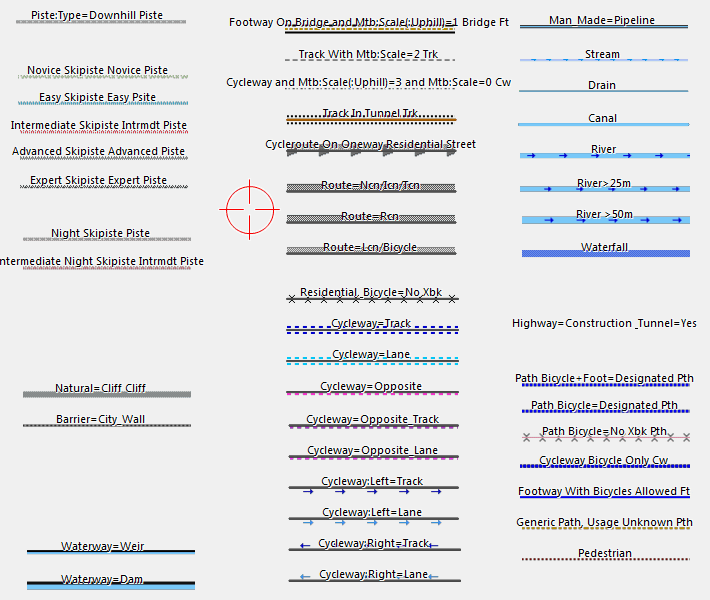
T2 -- sac_scale=T2 (mountain hiking) See: http://wiki.openstreetmap.org/wiki/Key:sac_scale Tv6=Trail_Visibility (6=no, 5=horrible,4=bad,3=intermediate) https://wiki.openstreetmap.org/wiki/Key:trail_visibility Xbk --bicycle=no Routes Differentiated by importance as follows (for Mountain Bike Routes as example) - if classified. If not it`s simply Mr. Rmn34 would be = Regional Mountainbike Route, mtb:scale=3, mtb:scale:uphill=4 Lmn3. = Local Mountain Bike Route, mtb:scale=3, mtb:scale:uphill=unknown. Highways See: http://wiki.openstreetmap.org/wiki/Key:highway Pri=primary / primary_link Cyclelane/Cycletrack See: http://wiki.openstreetmap.org/wiki/Key:cycleway Bklane=cycleway=lane Note: the first letter is always capital - I dropped proper usage of small/capital letters because it creates problems on quite a few older Garmin devices.
Which .typ file should I choose (VeloMap) - Sorted from Thin to Extra Wide? Thin - optimized for GPSMap 60/62/64/65 Medium width - - optimized for Vista/Legend/edge_705 Wide - optimized for Oregon/Colorado/edge x30/edge x40/GPSMap 66/67 (and more modern devices) *esyv --- Wide Easy - simple layout with (nearly) no additional info over traditional topo maps. Wide width. Modern streets. *race --- Racing Bicycle - The best layout for race/road cycling. High Contrast - red-yellow streets *trdn --- Desktop - Mapsource/Basecamp/Qlandkarte_GT/Desktop --- General big screen/resolution layout. It is the easiest to understand layout and optimized for big screens (800x600 or
Extra Wide - for 64 colour Display of Fenix watches / watches with MIP Display This is a low contrast layout only to be used on desktop/laptops - on your GPS device the lower contrast will make it harder to read (only useful if you want to have better contrast for tracks or routes) So below screenshots of all layouts on a desktop to show the difference: The classic Layout. The only difference to the wide layout is the thinner streets. Optimal for lower DPI garmin devices. The Classic legacy - notice the different colours of the main streets/highways. The Wide layout - same as classic but all lines are wider - for higher DPI devices The Wide legacy - again different main street colours The easy layout - it doesn't include things like cyclelanes/cycletracks that run parralel to other roads, or mtb:scale:uphill difficulty. Otherwise identical to Wide. The hiking Layout - more details about the difference on the MTB specific screenshot in the next section. The pathes are not colored according to MTB difficulty but according to hiking difficulty. It does show cycling routes and mtb routes but they are shown weakly so if you want to avoid mtb routes you can, walking, foot routes are shown prominently. Also of course no other mountainbike/cycling specific information. The Simple Topographical map layout - it is more simplified vs the hiking layout . Also it shows hiking, mtb, and cycling routes all only very thin/not prominent. For example there is no differentiation between highway=track / highway=service & tracktype=grade1/tarmac and highway=residential roads. The Desktop layout - the colors and features/objects are similar to Wide but it has much less contrast. So it is much more pleasing to the eye on a big screen. However on your GPS device it will be much harder to read. You can use it if you always follow tracks (not routes) and want them to pop out more. The winter layout - same as easy but additonaly shows sledge trails, nordic skiing trails and so on. Normal ski-slopes are also visible in the other layouts as they exist all year round. This layout has many things that are only visible in winter. The Fenix layout - this is here only for completion - it uses the best colours for the 64 colour display of the Fenix 5/6/7 series - however note on your watch they will look quite differently to the screenshot here. The features shown are a bit reduced as the display size is very small so to show the most important things for mtb / cycling only. It has very wide lines Notice the dashed lines showing Nordic skiing slopes in Ramsau am Dachstein which is famous for nordic skiing. Also shows sledge trails or some more features that are only visible in winter and removed for summer. Ski Slopes are usually well visible in summer too so visible in all OpenMTBMap layouts. The blue dots for example are winter hiking trails - only existing in winter (usually a groomed trail on a field). An example to show the difference of the Hiking layout not showing features for mtbikers to make the map easier but also usable for hikers. First the wide layout with all features for mtbiking now the a bit reduced easy layout (notice the mtb:scale:uphill information is missing) now the Hiking layout (hiking routes are black dashed): OpenMTBMap Standard features layout (as on Wide layout) - vs the Easy layout - and later VeloMap inner city example vs the easy layout missing the blue arrows for against oneway cyclelane on the center road. Also the living streets is shown as a normal residential street in the easy layout - I left out some not so important features and simplified them. Also the POI are less visible for shops and restaurants uncluttering the map. VeloMap Wide layout - nearly identical inside the city to the OpenMTBMap wide layout. The big difference to the OpenMTBMap is that some footways/pathes that are likely not allowed to be cycled, or not good surface are only shown very thinly. So better for commuting/riding fast. This is of course much more distinct if in some forest/mountain. Note it also misses the cycle route, that is because I used an older map for this screenshot when the cycle route was not yet built/present in Openstreetmap. The VeloMap Wide Easy Layout - same as the OpenMTBMap Easy layout - removed the cyclelanes/cycletracks parallel to roads, and simplified some things like living streets. The VeloMap Racing / Road Bike Layout - the difference will be more visible outside cities to the easy layout. - note previously it did not show buildings. I re included them because you now can remove the buildings alltogether (do not install them, or use the gmapsupp.img downloads instead of sending via MapInstall) The Velo Layout - thinner lines for low DPI devices. Street colours similar to google maps (though a bit more orange/red to still see differences in size of streets) The Velo Legacy Layout - Germany style street colours for very easy differentiation of the main streets. Same width as Velo. The Velo Wide Layout - same as Velo but wider streets for newer/higher DPI Garmin devices Wide Easy Layout - does not include cycletracks or cyclelanes that are parallel to streets and some more for most not important things. Look further down to the Inner City section to see the actual difference. The Road Bike / Racing layout - this leaves out many things not interesting for a road biker to quicker identify the streets useful for road biking. Note that if you do not want the buildings - then leave out the buildings layer (buildings add too much clutter for road biking in my opinion) The Simple Topo - Simple Topographical map layout. It is simplified to not show any information that a normal topographical map would also not show. So for example highway=track & tracktype=grade 1 (tarmac) is shown the same as highway=residential. Service roads are also shown like residential roads. It's the easiest to understand and get used layout. Cycle routes are only shown thinly - not prominently like in other layouts. The Desktop Layout - Same as Wide but much less contrast. This is much nicer to look at on big screens / desktop but not very useful on your Garmin GPS device - except if you want the map to be low contrast to have higher contrast for the pink colour of the GPX tracks. The Fenix Layout - heavily reduced and colour adapted layout for the small displays of Fenix 5/6/7 watches which can only show 64 colours. It looks actually a bit different on your watch than the screenshot - though also differs a lot due to angle/sun/backlight Sometimes people ask me should I use OpenMTBMap or VeloMap - let's put it clearly. If you are commuting or road biking or recreational cycling the VeloMap is much quicker and easier to read - because it has way less information. Here I show an example without contourlines and without buildings. If you want to hike or mtbike you need more information, you want more prominent trails so the map becomes more complicated to read. For Gravel I think in general the OpenMTBMap is more useful. For riding a trekking bike because you frequently have bad surface quality - but you prefer good surface over gravel roads just not huge roads with cars - the VeloMap will usually be better. vs the much simpler VeloMap - both wide layout. Note you can add the buildings and contourlines to the VeloMap.
The main road types:
Points of Interest

Areas
Abbreviations and Highway Attributes:
G1 -- tracktype=grade1 See: http://wiki.openstreetmap.org/wiki/Tracktype
See: http://wiki.openstreetmap.org/wiki/relation:route
Sec=secondary
Ter=tertiary
Cw=cycleway
Min=minor
Unsf=unsurfaced
Uncl=unclassified
Living=living_street
Pdstrn=pedestrian
Trk=track
Pth=path
Ft=footway
Fp=footpath
Brdlw=bridleway
Rd=road
Byw=byway
Ser=service
Bktrk - cycleway=track
Opp - cycleway=opposite
Opptrk - cycleway=opposite_track
*vthn --- Thin layout - like Velo legacy but even thinner lines. For low resolution Garmin GPS devices like GPSMaps series.
*velo --- Velo - The layout to be used on your GPS Device. High Contrast - for lower DPI devices - red-yellow streets
*vllg --- Velo legacy - same as above - but blue-green-red-yellow streets
*velw --- Velo Wide - The layout to be used on your high DPI - e.g. Oregon _ GPS Device. Same but wider lines compared to velo - red-yellow streets
*vwlg --- Velo Wide Legacy Same as above - the Wide Legacy Layout for VeloMap - but blue-green-red-yellow streets
*topv --- Simple Topo - Simple topopgraphical map style - Easy to understand - high contrast. Very different color scheme from the other maps.
*vfnx --- Fenix similar to velo Wide Legacy but optimized for Fenix series 5/6/7 watches which can only show 64 colours
Map Legend GeneralMap Layout/Style


Hallo Felix,
ich fahre meine Touren meist mit vorbereiteten Tracks. Dabei habe ich mich häufig verfahren, da sich der Track farblich kaum von den Straßen/Wegen auf der Karte abgehoben hat. Leider kann die Farbe des Tracks nicht verändert werden (oder habe ich da was verpasst??). Welches Karten Layout wäre am Besten geeignet, damit das möglichst nicht passiert?
Gruß
Du kannst zwar den Track passiv in Farbe nicht ändern – aber entweder den Track als Route duplizieren in Basecamp, bzw den Track nachfahren. Ab dem Zeitpunkt wo man den Track nachfärt wechselt die Farbe. Anonsten – das Eeasy oder Desktop Layout.
Ich habe den Track in Basecamp geladen und dann zur Route umgewandelt,gespeichert und wieder auf mein Garmin edge touring geladen. Abgesehen davon, dass die erzeugte Route nicht mehr mit meinem Track übereinstimmt (und genau das will ich ja vermeiden und die Neuberechnung ist auf dem Garmin abgeschaltet) ändert sich die Farbe nicht, wenn ich meine Strecke erreiche, ich finde das wenig verwunderlich …
Ich probiere es mal mit dem Desktop-Layout.
Du musst für die Route als Aktivität Luft wählen. Dann bleib sie gleich. Die Farbe wenn du Routing aktivierst ist dann Pink, und das verwende ich absichtlich so gut wie nicht in allen Layouts. Nur auf Anzeige aber nicht aktiv zum Routing sollte eigentlich Cyan Blau die Farbe sein. Bei neueren Garmin Edge kann man die Farbe selbst wählen am Gerät. Für Routen wird dann auch die Farbe aus Basecamp übernommen, für Tracks ist das nicht möglich als gpx, aber als gdb schon.
Leider verstehe ich dich nicht. Was soll eine Aktivität “Luft”sein? Außerdem will ich ja das Routing nicht aktivieren.
Bei meinem Garmin lässt sich keine Farbe einstellen …
Bei Routen kannst du Auto, Motorrad, Fahrrad usw einstellen – eine heißt Luft/Luftlinie/Direkt. Im Prinzip verhält sich die Route dann wie ein Track. Das Edge Touring ist halt hilflos alt – ich weiß auch nicht genau auf welchem Edge 800 das basiert hat. Die aktuell günstigsten gut funktionieren edge Geräte sind das explore 2 bzw halt das quasi idente 840 welches mehr Fitness/Power/Trainingsfunktionen hat wie das Explore 2. Edge 1040/1050 sind die Premium Geräte.
Ok, das Touring hat nur verschiede Radmodi (kein Auto oder Luft), daher hab ich es nicht verstanden… Trainingsfunktionen brauch ich nicht, es geht mir um Radwandern durch Europa.
Cyan Blau ist die gefahrene Strecke auf der Tour (und in der Kartenübersicht, wenn ich den Track lade), der importierte Track (von bikerouter) ist, wenn ich den Track nachfahre, wohl pink und hebt sich daher von diversen Straßen/Wegen nicht ab. In meinem Test mit dem Desktop-Layout, z.B. nicht von vielen lila/roten Dorfstraßen.
Ich probier es jetzt mit dem Velo Layout (früher hatte ich wohl Velo Legacy Layout).
Ich werde irgendwann eine Rückmeldung geben. Nun muss ich aber packen ..
Das ist kein Profil sondern die Einstellung unter Autorouting – die gibt es definitiv auch noch – aber ich weißt nicht welche Modi dort möglich sind. Die alten Edge Geräte damals habe ich wegen diverser Probleme nie empfohlen, erst mit Edge 840/1020/ bzw dem günstigen Edge Explore 2 wurden diese zur ersten Wahl in der Garmin Palette meiner Meinung nach.
Evtl mach mal einen Screenshot wie es ausschaut und laden den hoch – evtl ist auch was komplett falsch am Layout – wobei ich glaube das Kontrast/hochkontrast was auch immer Porfil mit den Problemen wenn man nicht klassisch auswählt gibt es erst ab der x40 Serie.
zum Thema POI, die sind auf einem Montana 700 so klein, das man nie weiss was das sein soll an Icons.
Gibt es eine Möglichkeit die POI in ein wenig grösser zu bekommen?
Oder zumindest einen Trick für Radfahrer wichtige POI fetter zu bekommen?
LG
Ole
Hallo Ole, ich habe die Symbole eh schon ziemlich groß – es ist ziemlich schwer da erstens nicht alle Symbole angezeigt werden (den Typ ändern geht aber nicht unbedingt – weil die Suchfunktion davon abhängt) bzw erst später eingeblendet werden wie in der Karte vorgesehen. Du müsstest die POI Symbole im Typfile bearbeiten. Das Problem ist das ich für alle Geräte die selbe Größe bei den POI nutze da der Aufwand dies je Layout zu ändern enorm ist (nicht einmalig sondern wenn ich Sachen ändere und dass dann jedes Mal beachten muss. Die Liniendicke variiere ich je nach layout – aber für POI je nach Layout die Größe zu variieren schaffe ich nicht vom Aufwand)
Hallo! Offensichtlich fehlt in der Legende “https://www.velomap.org/de/velomaporg/map-legend/” unter “Straßen, Wege und Linien” die Markierung für besondere Radwegenetze mit der breiten blauen Linie, siehe Kartenausschnitt VeloMap_france_25.03.2022 (im Desktop Layout).
Nur durch Setzen von Wegpunkten konnte ich herausfinden was diese Linie genau bedeutet (siehe Wegpunkt “Voie Verte Du Pont-Du-Gard …”.
oh ja – je nach Layout sind die Fahrradrouten nur schwarz oder schwarz bzw blau je nach Priorität – ich müsse die Screenshots oben mal anpassen. Aber am PC reicht auch Maus länger über den Weg halten und der Name kommt im Popup.
Hallo Felix,
kann es sein, dass in der derzeitigen VeloMap die OSM-Tags “highway=service” und “highway=services” verwechselt werden? Mapsource 6.16.3 zeigt bei jedenfalls an einem Parkbucht neben einem kleinen Sträßchen durch den Wald überraschend eine “Autobahnraststätte” an. Ich habe in JOSM nachgesehen: Der Parkplatz ist korrekt getaggt als “highway=service; service=parking_aisle”. Es handelt sich um OSM-Way 120586675, VeloMap Luxemburg vom 05.02.2022.
Das ist ein Punkt – keine Linie. ist dort kein Punkt/POI in OSM vorhanden? (Könnte teil des Weges sein).
Nein, der Way 120586675 besteht aus 6 Punkten, alle ohne weitere Tags. Daneben ist noch ein einzelner POI (Node 1540255978, “tourism=picnic_site”.
okay – hab es mir gerade auch angeschaut. es ist mir ein absolutes Rätsel wieso dass dort auftaucht. Ich habe mal ein paar Regeln verändert – aber nein im Prinzip habe ich nichts woraus der POI dort erstellt werden darf (POI aus Linien erstellen ist zwar aktiviert, aber es ist ja eindeutig highway=service und nicht highway=services )
Es scheint auch andere Elemente zu betreffen. Beispiel: Node 3142727421, highway=rest_area
Ich schaue es mir nochmals in der neuesten Version an.
Stimmt, rest_area wird scheinbar eher für Picknick Platz verwendet – dies werde ich korrigieren und durch den Picknick Tisch ersetzen.
Aber somit habe ich den anderen Fehler gefunden – Ein Polygon dort ist auch als highway=rest_area & landuse=grass getagged. Ich denke ich lasse den Picknick Tisch für solche Fälle drinnen. Zum nächsten Update also korrigiert..
Zuvor habe ich mich zu sehr auf das higwhay=service konzentriert und gesucht warum das als services erscheint. Das Polygon mit highway=rest_area habe ich übersehen bzw früher war im Wiki rest_area etwas anders dargestellt – quasi als Raststation auf Autobahn nur ohne Tankstelle. Daher habe ich es ident dargestellt. Die Beschreibung ist ja noch immer so – aber die Beispiele und Nutzung eher anders.
Hmm, die deutsche Wiki Beschreibung ist eher so dass die Karte zuvor korrekt war:
https://wiki.openstreetmap.org/wiki/DE:Tag:highway%3Drest_area
und das dort einfach Tagging Fehler sind: “Ein Autobahnparkplatz oder Rastplatz ist ein Ort, an einer Autobahn oder größeren Fernverkehrsstraße,”
bzw ich müsste ein komplett neues Symbol dafür erstellen. Ich werde es jetzt mit services gleichschalten WENN operator als Tag existiert.
Oh weh… dann ist das also ein häufig vorkommender Taggingfehler. In den vergangenen Tagen habe ich mir (via VeloMap und MapSource) Karten von unterschiedlichen Regionen Europas angeschaut und dieses Tagging doch recht häufig vorgefunden, auch, von den Dolomiten nach Korsika, weitab von jeglicher Fernverkehrsstraße…
bzw Inkonsistenz mit dem Wiki. Im Wiki ist es wohl quasi als große Raststätte ohne Tankstelle beschrieben, angedacht. Aber die Plätze die du verlinkt hast sind eher Picknickplätze an Straße mit Parkmöglichkeit. Das zu unterscheiden ist für mich beim Karten erstellen so wie derzeit genutzt kaum möglich.