In general I try to keep the installation on Mac OSx as simple as possible. And in general it's no more difficult compared to Windows. However some things might not be easy at the first time, so here comes an installation with screenshots for each step (mind I personally don't have a mac, so I took the screenshots from a remote computer running OS X 10.6.8 (Snow Leopard) and Basecamp v. 4.0.4.
This is a guide for Dummies, so it is quite long. You will actually find all of this very easy I hope and keep in mind, this guide is written for people who never used Garmin format maps on their Mac. If you have experience with other maps, You will only need to read through Step 1, Step 2 and Step 5. However you might find the general information at the end useful too.
The screenshots in this guide show installing an OpenMTBMap. For the VeloMaps it is identical - the folder is simply called veloCOUNTRY instead of mtbCOUNTRY - i.e. velotaiwan_macosx.7z
Contents
- 0.1 Prerequisites:
- 0.2 1. Step - Download - then Unarchive Maps:
- 0.3 2. Step - Install the map:
- 0.4 In case of Problems:
- 0.5 3. Step: Use the map with Garmin Basecamp for Mac
- 0.6 4. Step: Choose the layout of the Maps
- 0.7 4b) Step: Delete Basecamp TileCache
- 0.8 5. Step - Chose between 10m and 20m contourlines or no contourlines
- 0.9 6. Step: Send the Map to your GPS using Garmin MapInstall
- 1 General information about he OpenMTBMaps and using them
Prerequisites:
So as a prerequisite get the newest version of Garmin Basecamp from here - https://www8.garmin.com/support/download_details.jsp?id=4449
This should include, Garmin MapManager for Mac, and Garmin MapInstall for Mac. We need all three programs installed to continue...
If they are not included in Basecamp download (seems to be the case lately) - get them from here: http://www8.garmin.com/support/download_details.jsp?id=3825
If I talk about right-click, I mean secondary click. If you don't know how to do that on your Mac, google it up - you miss out on many features without it in general. In general it is done by CTRL & Click if your mouse has no right click button.
You likely also need to Install Android File Transfer or OpenMTP so MapInstall can see your device (needed for all new Garmin GPS devices using MTP):
https://www.android.com/filetransfer/ or often described as better OpenMTP https://openmtp.ganeshrvel.com/
Also see here: https://support.garmin.com/en-US/?faq=ufgaLgXyiX2eSZfAsQhdu7&searchQuery=not%20recognized%20catalina
1. Step - Download - then Unarchive Maps:
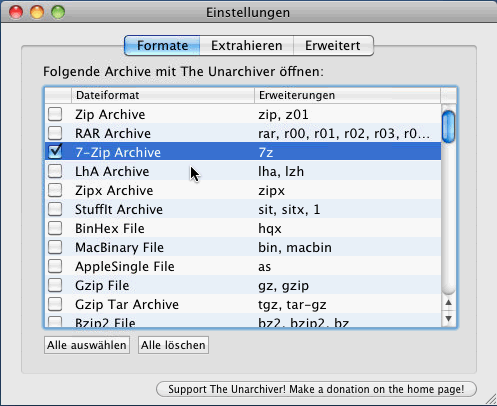
You will need The Unarchiver (or any other unarchive program with support for lzma2 !) to unarchive your downloaded maps, Get The unarchiver here: https://theunarchiver.com
During the setup, the settings page should popup, tick: "7-zip Archvie" - as shown below.
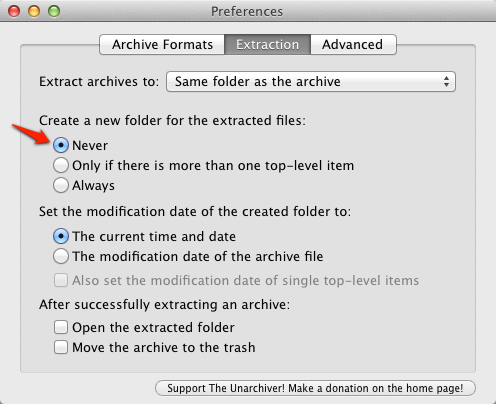
during install, also make sure that under "Extract archives to: Same folder as the archive" ---> Create a new folder for the extracted files:
either "Never" or "Only if there is more than one top-level item" is selected.
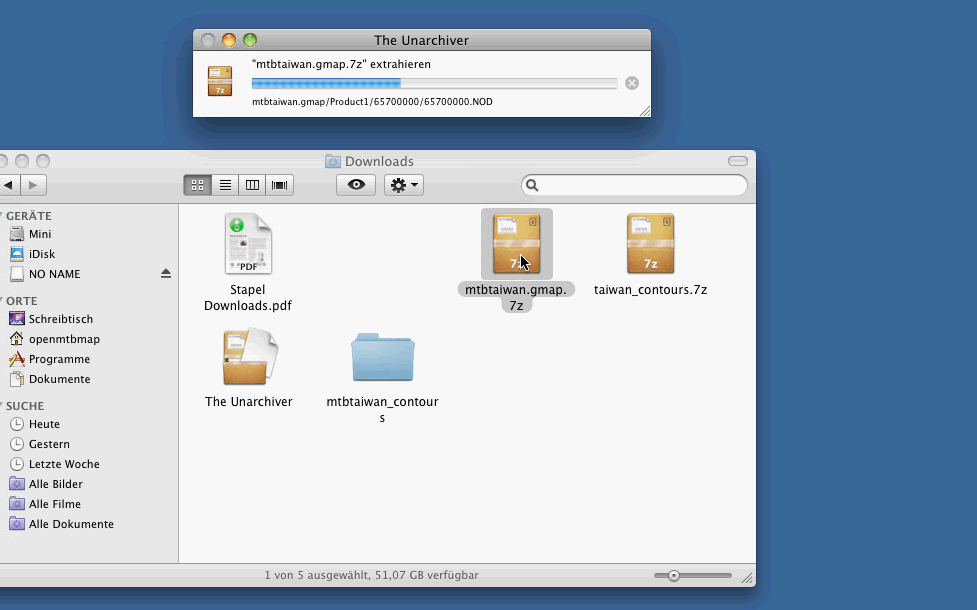
Then just doubleclick on the mtbCOUNTRY_macosx.7z (in this example mtbtawain_macosx.7z). It will be extracted as mtbtaiwan.gmapi (in case of problems it is good to know - inside the mtbCOUNTRY.gmapi you will find the mtbCOUNTRY.gmap).
2. Step - Install the map:
Double Click on the unarchived download. It is called mtbCOUNTRY.gmapi (COUNTRY standing for the country you downloaded).
Note on newer Mac OSx version doubleclick may not open MapManager - use right click instead - then select "open with Garmin MapManager".

Now you will see MapManager pop up. Click on the blue button to continue. You will see the mapname again
Usually, but not always, once installed MapManager will popup - here you can see the full name of the map (in this case openmtbmap_taiwan_11.01.2013) and on the right site the place where it is installed to - this place is /Users/YOUR_USERNAME/Library/Application Support/Garmin/Maps/mtbtaiwan (taiwan in our example, germany would be mtbgermany, and so on). If we click on an entry, and then rightclick, we could uninstall a map from here. Also we can open the installation directory for any map from here - which is very useful and needed later on.
If it doesn't pop up, installation should have been successful too. Here you can see all your installed maps, and if you want to remove a map, open MapManager, right click on the map, and Remove/Uninstall it.
In case of Problems:
If on clicking on mtbCOUNTRY.gmapi (COUNTRY is a placeholder here for the name of the country - e.g. Germany or Taiwan) the package is opened in Finder (or your File explorer) - instead of MapManager popping up here is what to do:
First Try: Open Garmin MapManager, and find the mtbCOUNTRY.gmap folder you want to install (the mtbCOUNTRY.gmap folder is inside the mtbCOUNTRY.gmapi folder) - and open it from within Garmin MapManager! (see Prerequisites about Garmin MapManager installation)
Second Try: If installation from within Garmin MapManager should fail too (I don't know why it would) - you can move mtbCOUNTRY.gmap (the mtbCOUNTRY.gmap folder is inside the mtbCOUNTRY.gmapi folder) into the following folder: /Users/YOUR_USERNAME/Library/Application Support/Garmin/Maps/
Note you need to move the gmap folder which is inside the gmapi folder - not the gmapi folder. Since I took those screenshots I adapted the map format (as garmin did so too) from mtbCOUNTRY.gmap to mtbCOUNTRY.gmapi/mtbCOUNTRY.gmap as in some cases this would solve the problem of Garmin MapInstaller not opening.
Alternatively you can install the mtbCOUNTRY.gmap to: /Library/Application Support/Garmin/Maps/ (top level - not inside your user folder). Both Locations are perfectly fine - but best only use one of them for all of your maps. If you have the same country map in both locations - you are asking for trouble.
(also see the map manager Screenshot above - actually MapManager does nothing else than move the .gmap package (folder) for you - once it is placed there - it will be found by Basecamp).
Delete Basecamp Cache
If you open the map before it's fully installed - Basecamp may cache an empty map:
to delete cache – clear:
~/Library/Caches/com.garmin.BaseCamp/TileCache
~ being your home folder.
You can do this from Terminal using the command /bin/rm -r ~/Library/Caches/com.garmin.BaseCamp/TileCache/*
it's also possible that the Tilecache is located here - so use:
/bin/rm -r ~/Library/Containers/com.garmin.BaseCamp/Data/Library/Caches/com.garmin.BaseCamp/TileCache
or here - use:
/bin/rm -r ~/Library/Containers/BaseCamp/Data/Library/Caches/com.garmin.BaseCamp/TileCache
3. Step: Use the map with Garmin Basecamp for Mac
When you startup Garmin Basecamp for Mac, it will show you the last installed map (or the map you last used Basecamp with). In our case - this is the map of Taiwan. Now you can zoom in and work with the map just like any other map. If it's your first time, best play around a bit and read the manual if you're unsure.
All maps support autorouting - I recommend you to use the "routing-function". It's the easiest and quickest way to create routes.
I recommend to set the profile to "Car" (German Auto) or "Bicycling" for best results - Read through here for understanding how the OpenMTBMap works with Autorouting and which avoidances you should activate/deactivate.
- here you can see a quick sample route. After planning wit the Routing-Function, you can finetune the route using the Select Function and drag it around like on Google Maps.
If you want to switch between maps (this will only work if your have several maps installed) - make sure you got the MapSelector Tool in the Basecamp iconbar active, it is not active by default - here is how it looks - Globale Karte (third item from the left in the top list), you will have to get it from the toolbar menu with all items. I also recommend you to put the Routing-Function (here Routen-Funktion) from the very top right on the screenshot into your toolbuttons active all the time (I put it besides the map selector). You might also find the Track-Function very handy:
4. Step: Choose the layout of the Maps
The OpenMTBMap currently comes with 6 different Map Layouts - unluckily this is not as easy to choose on Mac. But I tried to make the selection as easy as possible. Please read up which layout(s) best suit you here in the: Map Legend or on the Screenshots on Desktop or Screenshots from GPS
First - Open the installation folder. The place of installation you can find out with Garmin MapManager. It should be: /Users/YOUR_USERNAME/Library/Application Support/Garmin/Maps/mtbtaiwan.gmap (taiwan in our example, germany would be mtbgermany, and so on) - You can do so by Opening Garmin MapManager, and clicking onto "Show in Finder" (here Im Finder anzeigen)
Then rightclick on the map (in this case mtbtaiwan.gmap): and choose "Show Package Content" - it should the third entry. In German on the example here it is "Paketinhalt zeigen".
Now the Map Package will open (note, that in principle any map package is just a simple folder, but Garmin MapManager makes you see it as a so called package - with Finder alternatives like MuCommander you can just open the map package, without right-click):
Here you see how the Mapinstallation folder looks like. In the "Layout Files" section - the different map layouts are saved. Open the folder Layout Files, then choose the desired Layout folder (e.g. Classic_Layout), go into it, and copy the typXX.TYP file. Go up again to the main folder (mtbtaiwan.gmap) and just paste it in, overwriting the old (in this case) typtw.TYP.
Here is a quick overview about the folders inside Layout_Files:
a) Two folders to enable/disable showing the contourlines. "20m_contourlines" respectively "10m_contourlines" with an Info.xml inside to enable the contourlines and "Remove_Contourlines with an Info.xml to disable the contourlines in the map. Just copy/paste the Info.xml from here to the main folder, i.e. mtbtaiwan.gmap and overwrite the Info.xml in there. by default the 20m contourlines are active for all maps that have contourlines integrated and not in a separate download of course.
b) The map layout folders with a .TYP file inside.
- Classic_Layout (typical OpenMTBMap layout - optimized for high contrast and lots of information),
- Easy_Layout (easy OpenMTBMap layout for mtbiking - for those who prefer a cleaner easier to understand map compared to classic layout)
- Hiking_Layout,
- Thin_Layout (based on Classic but thinner lines),
- Wide_Layout (based on Classic but wider lines and streets)
- Dekstop_Layout - low contrast for working with Basecamp.
The VeloMap has the following layouts right now:
- Dekstop_Layout - low contrast for working with Basecamp
- Velo_Layout (typical VeloMap layout - optimized for high contrast and lots of information),
- Race_Layout (high contrast for race cycling, only paved ways and streets are shown prominently)
So you copy the typXX.TYP and then paste it inot the main map folder - i.e mtbtaiwan.gmap, then you have the new layout activated. Note, you must no have Basecamp open at the same time, else the file is locked and cannot be overwritten!
Here I'm copying typtw.TYP from the Classic_Layout.
Now Going back up to "mtbtaiwan.gmap" (or mtbCOUNTRY.gmap) and pasting the .TYP
and finally confirming the overwriting - that's it. Once you've done it once, it's easy.
4b) Step: Delete Basecamp TileCache
If you change the layout of the map - and the map was shown before alreay - Basecamp will have cached it - so you cannot see the new layout (except by moving out of the area/zoom setting of the cache). To do So delete the contents of:
~/Library/Caches/com.garmin.BaseCamp/TileCache
(~ being your Home Folder).
You can do this from Terminal using the command /bin/rm -r ~/Library/Caches/com.garmin.BaseCamp/TileCache/*
it's also possible that the Tilecache is located here - so use:
/bin/rm -r ~/Library/Containers/com.garmin.BaseCamp/Data/Library/Caches/com.garmin.BaseCamp/TileCache
or here - use:
/bin/rm -r ~/Library/Containers/BaseCamp/Data/Library/Caches/com.garmin.BaseCamp/TileCache
5. Step - Chose between 10m and 20m contourlines or no contourlines
Read through 4. Step on more detailled instructions how to open /Users/YOUR_USERNAME/Library/Application Support/Garmin/Maps/mtbCOUTNRY.gmap (taiwan in the example screenshot, germany would be mtbgermany, and so on)
Go into the Layout_Files folder and chose copy the info.xml that you find in the 10m_contourlines folder to /Users/YOUR_USERNAME/Library/Application Support/Garmin/Maps/mtbCOUNTRY.gmap if you want to activate the 10m contourlines. If you wan the 20m contourlines - you would copy the info.xml from the 20m_contourlines folder. And if you do not want to see contourlines - then copy the info.xml from Remove_contourlines folder to /Users/YOUR_USERNAME/Library/Application Support/Garmin/Maps/mtbCOUNTRY.gmap
Then if you opened the map before - look at 4b) Step: Delete Basecamp TileCache to delete the Tilecache.
6. Step: Send the Map to your GPS using Garmin MapInstall
Note only on Mac OSx running on new M1/M2 (or newer) chips / Catalina or newer with new Garmin devices using MTP instead of appearing as a drive (Edge 1040/1050/Fenix 7/8 / Epix 2 / ....)
You need to Install Android File Transfer so MapInstall can see new Garmin devices that don't use mass transfer mode but MTP:
https://www.android.com/filetransfer/
or reported to be more reliable/better OpenMTP: https://openmtp.ganeshrvel.com/
Also see here: https://support.garmin.com/en-US/?faq=ufgaLgXyiX2eSZfAsQhdu7&searchQuery=not%20recognized%20catalina
NOTE: on Old GPS all maps have to be sent at once. And can then be activated/deactivated via Menu on your GPS. (old GPS e.g. Vista HCx, GpsMaps 60 CSx). On new generation GPS (e.g. Dakota, Oregon, edge 800, GpsMaps 62, Montana), you can send the maps one at a time as you like.
Make sure you connected your Garmin, or put the memory card into a cardreader on your Mac (that is what I recommend on older devices - as they have very slow USB 1.1 connection so sending maps takes a long time). If not it will look like this - with the selector empty so you cannot continue:
For devices using SD cards - The SD-card needs to be formatted FAT32 with Master Boot Record:
Now that everything is ready - here we go - open Garmin Mapinstall (you can find it in Basecamp on the bottom of the Maps Menu - or open it from your app drawer)
or you can open Mapinstall it by right clicking on the memory card of the connected device - and then "Install Maps on ...":
Watch out on Advanced/Partial Install of Maps:
We choose the region not by left clicking into it, but by dragging the mouse over the region we want - while holding the left mouse button (else you miss the contourlines)!
I selected a second map, by choosing another map on the MapSelector in the image above, and also choosing the region I want. Note that you shouldn't overload your GPS device with maps. I recommend max 2GB for old Garmin GPS, and 4-6 GB of Maps maximum for new generation Garmin GPS devices. Note also there is a limit of 2048 or 4096 maptiles depending on your GPS device. If you put too many maps onto it, then starting the device will be slow, and using the search function will be slow too.
Then I click on "Send Maps" (Karten senden) and MapInstall asks for Confirmation - showing me what will be installed - which we confirm again:
And we can go and have a coffe while the maps are sent (depends on the size of the map, how long it takes). Especially on older GPS - best send the maps to the micro-SD Card that you use with it, and put that micro-SD Card into a cardreader on your Mac, so it sends much faster (old Garmin GPS units only have USB 1.1)
More Detailed instructions on sending maps can be found here:
Send Maps with MapInstall to Device
General information about he OpenMTBMaps and using them
Using the maps on your GPS
Please read through the following three topics:
howto-setup-your-gps/ and autorouting/
and https://openmtbmap.org/about-2/plan-routes/
Participate in Openstreetmap and help to make the maps better:
The OpenMTBMaps are based on Openstreetmap, hence you can help to improve the map data!
Activating 2d view in Basecamp:
The 3D view is confusing to many users, and slower than the 2D view - I advise you to switch to 2D view in general using Basecamp:
Note - several users have reported that Basecamp under mac OSx Big Sur (or newer) runs very sluggish in 2d mode. The solution to this is to run it in 3d mode - but set the 3d mode to 0% elevation gain - making it identical to the 2d view.


New issue:
The latest firmware on Edge 1040 and 1050 only has MTP mode support. They seem to have removed mass storage. On macOS, Basecamp can still see the device, but mapinstall can’t
You can use OpenMTP and then move files manually. Maps go to /garmin folder. I will add this to the tutorial soon.
I wanna send the full europe map to the device. I could use mkgmap, but the macOS maps don’t use .img files. Do I need to use Linux for this?
Do not send the full map, maximum half for performance reasons, and problems with max tile limitations. Best just create the img file with MapInstall to an external disc/device, then move it with OpenMTP to garmin folder. Doable on a Mac (for Europe map it’s easier than Linux, as there it’s hard to get MapInstall running)
Hello.
I downloaded the unicode map from this page, but I only see the city markers and major highways. There are no streets and buildings. What am I doing wrong?
Hi, I guess you mean the Europe map? Or which exact map are you speaking off? In that case your forgot the steps 2ab) from the tutorial on how to install the maps on mac osx.
Thank you. The file necessary for those steps wasn’t present yesterday
It’s present if you are logged in.
Guten Tag! Ganz ehrlich gesagt, ist diese Beschreibung für das Installieren auf dem MAC einfach ein Witz und ziemlich dreist. Denn zum einen ist diese nicht aktuell, mit Fehlern behaftet und, wie Vieles hier, unnötig kompliziert gemacht. Wenn man davon lebt, kann ich als Kunde doch mindestens erwarten können, dass ich nicht stundenlang am Laptop sitzen muss, weil ich eine Riesenkarte mit separaten Höhenlinien installieren muss, nur weil der Leitfaden so grottenschlecht ist.
Das Format der karten für Mac ist quasi ident zu dem wie Garmin früher selber die Karten für Mac vertrieben hat. Ja die Screenshots sind mit älterem Mac System gemacht – ich habe selber keinen Mac, aber soweit ich weiß ist da nichts veraltet, und es sind auch keine Fehler vorhanden.
Unnötig kompliziert? Was denn genau. Das die Höhenlinien bei einigen Karten separat sind, spart viel Zeit beim Download. Daher betrifft es auch nur Länder wo die Höhenlinien größer sind als die Karte an sich. Garmin hat das leider am Mac für die Karten nicht einfach gemacht.
Apparently the format of the contourlines (e.g.europe_contours.7z) has changed. Earlier there was just a bunch of 7* files. Now we have a gmapi (e.g. contours_europe20m.gmapi).
Above instructions seem to be still the same. What is the idea: extract the 7* files from the gmapi or install it directly somehow? If the latte would be possible: Maybe a common install of the contourlines could be shared between installations of VeloMap and mtbmap?
Install it as gmapi to have it as separate map – enter it and copy out the 7* folder to integrate it into the Europe map. I have to adapt the tutorials for this. Reason behind is – only that way you have the option of changing the layout of the contourlines (as separate map). Plus make it easier if you send both VeloMap and OpenMTBMap of a a country with separte contours.
Thank you for the quick reply 🙂
I am not sure whether I get it right:
> Install it as gmapi to have it as separate map – enter it and copy out the 7* folder to integrate it into the Europe map.
Are these alternatives or do I have to do it both?
If I have it as a separate map (only) can I activate both maps (VeloMap + contourlines) at ones to have them combined?
alternatives. You can only see one map at a time in Basecamp. But several on your GPS device.
Understood, thanks 🙂
Hallo extremecarver,
vielen Dank für Deine Lösungsvorschläge und die Files. Ich kriegs leider nicht gebacken da auf dem M1 ARM Prozessor meine Tools mit CrossOver und Parallels nicht laufen.Ich könnte zwar Windows ARM installieren aber da sollen die Tools auch nicht laufen. Wer weiss ob das jemals portiert werden wird. Denke eher nicht. Ich könnte eine andere Karte verwenden, möchte ich aber nicht. Vielleicht kannst Du mir eine Velo Wide HD senden mit den beiden Straßentypen Primary in Gelb anstatt Rot und Secondary auch in Gelb anstatt Orange.
Damit wäre mein GPX Track wieder “sichtbarer” sobald ich in die Nähe dieser Strassentypen komme. Evtl. könnte man generell diese Farben verwenden, ich denke das da mehrere Reiseradler Probleme mit haben. Man ist ja auch nicht mehr der jüngste 🙂
Nochmals vielen Dank für Deine Hilfe und allen ein schönes Wochenende, Rafael
P.S. Der Tausch der TYP Files im Basecamp nach Deiner Anleitung funktioniert problemlos!
Hallo extremecarver,
Danke für die schnelle Antwort. Mit Linux muss ich das mal testen – danke für den Hinweiss.
Mich stört einfach nur das einige Straßen “rot” sind. Ich fahre geplante Tracks im Navi ab und diese werden in Lila oder Magneta angezeigt. Unterwegs kommt es dann schon mal vor das ich nicht mehr erkennen kann ob es der Track oder eine Straße ist und mich dann verfahre. Zumal das Display noch etwas spiegelt.
Ich wollte einfach nur die Straßen umfärben um meinen Track besser erkennen zu können.
Gibt es dazu vielleicht ein TYP File das ich verwenden kann. Das Velo Wide gefällt mir recht gut bis auf die Straßenfarbe.
Viele Grüße, Rafael
du kannst hier mal das velo wide als Text haben – ich bin mir nicht ganz sicher ob es 100% ident ist – da mit Typwiz dekompiliert – es sollten aber wenn nur Kleinigkeiten sein die anders sind.
okay – ich glaube text geht nicht als attachement. Ich versuche es mal gezipped.
velw
Hallo,
kennt jemand ein Tool unter MacOS mit welchem man TYP Dateien anpassen kann? Und damit es noch schlimmer kommt sollte das auch noch auf dem Mac mini M1 laufen.
Vielleicht ein simpler Text Editor? Irgendwas, Hauptsache ich kann mir das File ein wenig anpassen ans Montana 700 (Radreisen)
Viele Grüße
Rafael
Graphisches Tool leider nein – es gab mal Online Editoren aber soweit ich weiß – gibt es keinen einzigen davon mehr. Was geht ist auf einem Windows/Linux System das .typ file dekompilieren in .txt Form – und dass dann mit mkgmap (java) dann plattformunabhängig wieder zu kompilieren. Ist dann halt reines text editieren. Ich nehme mal stark an Java SDK läuft vollständig auf Mac M1.
Das Problem wäre dann noch – da ich meine .typ Files mit MapTK erstellt habe – welches nicht zu xml dekompiliert sondern zu .prj (eigenes Format) – kann ich kein korrektes XML erstellen. mit typviewer oder typwiz mein .typ-file dekompilieren erzeugt nicht 1:1 XML (Die Unterschiede sind aber gering – evtl inzwischen auch repariert).
Siehe auch: https://wiki.openstreetmap.org/wiki/Mkgmap/help/TYP_files
Und Linux könntest du glaube ich alle diese Editoren mit WineHD zum laufen bringen.
Hallo! Ich schon wieder! Vielen Dank für die Email, ich bin jetzt wieder beigetreten. Ich versuche gerade verzweifelt, die “unarchiver” unzipped maps via Garmin MapInstall im Map Manager zu installieren. Allerdings ist die Karte als .img vorhanden anstatt des verlangten .gmap. Änderung des Formatkürzels bei Hand hilft auch nicht, der Map Install sieht die Karte im Finder nicht (greyed out).
Ich hab einen Mac, habe BaseCamp und die beiden Map Programme installiert, und have die Datei mtbgreat-britain_gmapsupp via Unarchiver unzipped.
Vielen Dank nochmal für die Hilfe!
Karin
Du hast die Falsche Version heruntergeladen. .img sind die Karten direkt fürs GPS Gerät – du musst du mac osx Version herunterladen: https://www.velomap.org/de/download/macosx/